Guide with all the necessary steps so that you can change the components of the Xiaomi Mi 10T (M2007J3SY) yourself.


To begin, we apply heat to the back cover, and with the help of a plastic tool we will take off all the edges of the case, being careful not to damage it.


We extract the five Phillips screws (PH # 00) that hold the camera lens and the trim, and with the help of a tool we will remove it.


We extract the seven Phillips screws (PH # 00) that hold the intermediate housing, and we will lift it to where the battery is located, since before removing it we have to disconnect the flex from the rear flash.


We disconnect the battery to work with greater safety.


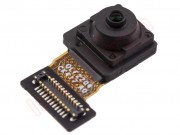
We take off the adhesive that covers the front camera connector, and we can disconnect it and change it for the new camera that we have.