Guide with all the necessary steps for you to change the components of the Ulefone Armor X5 yourself


We apply heat with a thermal mat on the screen, with a metal tool we will open a small gap and introduce a plastic spike, with which we will take off all the edges until we can take them off all their contour.


Once the screen is separated, we will remove the Phillips screw (PH # 00) that holds the shield, we will remove it with an antistatic clamp and release the connector with the help of a plastic tool.


Once the screen is separated, we remove the tray, and remove the eleven Phillips screws (PH # 00) that hold the intermediate housing


Once the intermediate housing of the terminal is separated, we disconnect the battery with the help of a plastic tool.


We disconnect the microphone from the auxiliary plate with the help of a thin plastic tool, then we will remove the three Phillips screws (PH # 00) that hold the plate to the chassis, and with the help of a thin plastic tool we lift the plate from a corner to remove it.
We lift the vibrator from its housing by prying it from its base, and disconnect the coaxial from the plate to be able to remove.


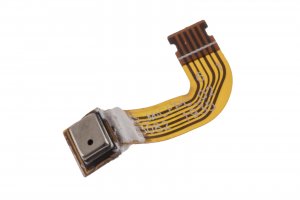
With a thin metallic tool we remove the white adhesive that surrounds the microphone and very carefully we are removing it from its housing.


