Guide with all the steps necessary for you to change the audio output connector (mini-jack) and the proximity sensor of the Sony Xperia Z2 yourself.


Before starting make sure that the mobile is off.
Remove the SIM and micro SD cards.


To be resistant to water, the Z2 comes completely sealed. To open the back cover we apply heat to soften the glue.
Use the hot air gun or HOT GLASS to heat the back cover.
Once opened this smartphone will lose the water resistance.


Insert the tip of the tine behind the back cover and traverse the contour to detach the adhesive.


Separate the back cover, this contains the NFC antenna.


Unplug the rear camera from the motherboard and pull it gently to remove it.


Remove the remaining adhesive from the battery.
Remove the adhesive that covers the flex of the battery.


Remove the 2 Phillips screws that hold the battery.
Disconnect the battery from the motherboard.


Remove the battery.


Disconnect the coaxial cable at the end of the motherboard.


Remove the WIFI antenna, held by 1 Phillips screw.


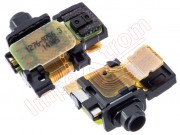
Remove the adhesive that protects the audio connector.
Remove the Phillips screw that holds the motherboard.


Unplug the lower flexes and the connector from the audio output on the motherboard.


Separate the base plate by gently prying with the opening tool.


Separate the component little by little. It comes well stuck and sealed to ensure the tightness of the phone.


Finally separate the component.