Guide with all the necessary steps so that you can change the screen of the Samsung Galaxy S7 Edge (SM-G935f) yourself.


Before starting, make sure that the equipment is turned off.


Remove the SIM tray with the removal tool.


To begin with we will have to remove the back cover. This is very glued so we will apply heat to soften the glue.
With the help of a tool with suction cups, we will pull it to facilitate the entry of the quill.


Having entered the prong, we will carefully cover the contour to take off the lid.


Remove the 12 Phillips screws (PH # 00) from the top-
Remove the antenna with the help of a plastic opening tool.


Remove the intermediate housing with NFC antenna.


Remove the lower module with loudspeaker.


Unplug the front camera from the motherboard and remove it.


Unplug the flexes from the motherboard: battery, screen, ignition and volume buttons and earphone.


Disconnect the coaxial cables and the lower flex.


Remove the plate by prying it gently.
Use antistatic protection to manipulate the base plate with your hands.


Peel off the battery, prying gently with a plastic spatula.


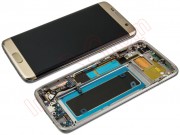
Taking off this screen is more difficult than usual, because it is curved.
We will apply heat to the surface of the screen to soften the adhesive.
For this, we will use the Hot Glass. Simply insert it in the microwave (see instructions) and apply hot on the screen for a few minutes.
Try inserting the prong between the glass and the plastic frame.


You can help with a plastic card and more pins.
Move the spike or the card around the outline of the screen to release the adhesive.


From the back, gently push with your finger in the middle of the screen.
Finally, separate the bottom part, without damaging the flex of the front buttons.