Guide with all the necessary steps so that you can change the components of the Samsung Galaxy A51 (SM-A515F) yourself.


To start, we apply heat to the back shell with a thermal mat for a few minutes, to soften the adhesive, and, with the help of a fine opening tool, we open a small hole to insert the plastic spikes and thus take off the edges of the housing without damaging it.


We remove the thirteen Phillips screws (PH # 00), extract the card tray with a SIM extraction tool and carefully unhook the frame with a pick.


We disconnect the battery to work more safely.


We disconnect the flex from the screen, the coaxial cable and the fingerprint reader, remove the two Phillips screws (PH # 00) and remove the fingerprint reader.


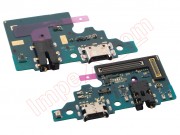
Finally, with a fine plastic tool we extract the auxiliary plate.