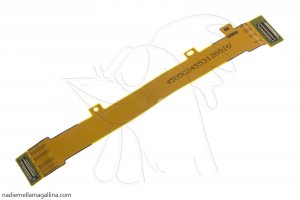
Nokia Lumia 830 - Interconnection Flex

Guide with all the necessary steps so that you can change the interconnection flex of the Nokia Lumia 830 (RM-984) yourself.

Difficulty
1
2
3
4
5

Tutorial: Step by step

Step 1 Specifications

Dimensions: 70.7 x 139.4 x 8.5 mm

Weight: 150 g SoC: Qualcomm Snapdragon 400 MSM8926

Processor: ARM Cortex-A7, 1200 MHz,

Number of cores: 4

Graphics processor: Qualcomm Adreno 305,

Number of cores: 1

RAM memory: 1 GB

Internal memory: 16 GB

Memory cards: microSD, microSDHC, microSDXC

Display: 5 in, IPS, 720 x 1280 pixels, 24 bit

Battery: 2200 mAh, Li-ion (lithium ion)

Operating system: Microsoft Windows Phone 8.1

Camera: 3840 x 2640 pixels, 1920 x 1080 pixels, 30 fps

SIM card: Nano-SIM Wi-Fi: a, b, g, n, Wi-Fi Hotspot

USB: 2.0, Micro USB

Bluetooth: 4.0

Location / Navigation: GPS, A-GPS, GLONASS, Wi-Fi, Cell ID

Step 2 Battery cover

Using an opening tool, remove the battery cover.

Step 3 Battery

Remove the battery.

Step 4 Cards

Remove all cards from the phone.

Step 5 Intermediate housing

Remove the 7 Phillips screws.

Step 6

With the help of an opening tool, remove the intermediate housing.

The narrowest parts of the housing are very weak and can break, so be very careful when unhooking those areas.

Step 7 Motherboard

Disconnect all components to remove the motherboard.

Step 8

Step 9

Lift the motherboard and disconnect the coaxial cable.

Step 10 Vibrator

With an opening tool remove the vibrator.

Step 11 Proximity sensor

With the help of an opening tool, take off the flex of the proximity sensor.

Step 12 Frontal camera

With an opening tool remove the front camera.

Step 13 screen

Apply heat to the screen, you can use a heat blanket, a hot air gun or a thermal mat.

If you are going to use the heating blanket, carefully read the instructions for use.

Step 14

Using one or more tines, take off the screen with care not to damage the flexes of the digitizer or the display.

Step 15 Interconnection Flex

With the help of an opening tool, remove the flex connectors from their slots, and remove them.

Video Tutorial summary

In this video you can watch a quick summary of the tutorial, but we recommend to follow the complete tutorial, with its explanations and detailed images.
Share this tutorial