Guide with all the necessary steps for you to change the iBold B motherboard (IBSD40) yourself.


Before starting, make sure the equipment is turned off.
To remove the back cover, use an opening tool to avoid damaging or scratching the case.


Separate the back cover.


Remove the battery by pulling it from the bottom.


Remove the SIM cards by pulling them with your finger.


To remove the microSD card, pull the tray upwards.


Remove the 8 Phillips screws that hold the middle housing.


Separate the housing with an opening tool, thus avoiding possible damage or scratches.


Remove the side keys with the help of tweezers.


Disconnect the flex cable from the screen by pressing the connector tab and gently pulling the cable.


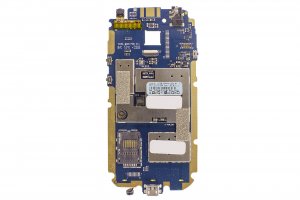
Remove the 2 Phillips screws that hold the motherboard.


Separate the motherboard from left to right, as shown in the photos.
The data connector on the display will be released when doing so.


Peel off the protective plastic from the camera connector.


Remove the camera by pulling on the tab of the connector and pulling gently.


