Guide with all the necessary steps for you to change the components of the Huawei P30 Lite (MAR-LX1A) yourself.


First we apply heat to the back cover to soften the adhesive that holds it, we introduce a thin tool with which we will open a small hole to introduce one or more plastic spikes, and thus we will not run the risk of not damaging the back cover.


We disconnect the interconnection flex from the fingerprint reader.


We remove the eight Phillips screws (PH # 00) that hold the intermediate housing and unhook it.


Remove the Phillips screw (PH # 00) that holds the shield, and we will take off the black adhesive that is above the battery.


We disconnect the battery connector to work with greater security, and the interconnection flex of the fingerprint reader to work with greater comfort.


We remove the seven Phillips screws (PH # 00) that hold the module, and with a flat tool we will unhook it.


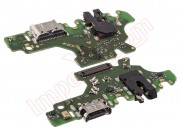
We disconnect the interconnection flex and the coaxial cable, and with the help of a flat tool we will take off the plate that we are going to replace.