Guide with all the steps necessary to change the HTC Desire 620 motherboard yourself.


As usual, we will start by removing the back cover. Using a plastic opening tool, we will disengage the screen from the notches that hold it by making lever movements.


After removing the back cover, we have access to the battery, which we will remove by using the opening tool.


To remove the SIM and microSD cards we can help with the opening tool or simply by pulling them.


In order to remove the intermediate casing we will have to first remove the twelve Phillips screws (PH # 00) that fasten it to the chassis.


We will start unhooking the notch that is next to the battery connectors so that we do not forget later.
Now, with the opening tool or another plastic tool, we will unhook the housing from the notches in the chassis.


In this step we disconnect the flex from the display, the coaxial cable and remove the screws that hold the plate.


We will leverage with some plastic tool to disengage the screen.


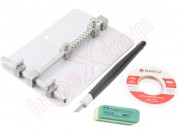
To leave the motherboard without more components we will have to desolder the vibrator. We will finish using desoldering mesh to clean the contacts (in case the plate still works).


With the vibrator already desoldado we can take it off. Now we will disconnect the proximity sensor and the front camera.


Finally, we disconnected the rear camera from the motherboard.