Guide with all the necessary steps so that you can change the auxiliary plate of the Elephone S7 yourself.


We will start by heating the screen at about 60 ° C for about a minute to soften the adhesive.
With the hot screen, we will introduce an opening tool between it and the frame to detach it.


Before separating the screen we will have to take off the flex of the home button and so we can move it to have access to the screws that hold the flex of it.
After removing the shield, we can disconnect it.


To remove the chassis, first remove the flex from the home button. We will also remove the screws, the SIM / SD tray and the adhesives.


In this step we will heat the back cover of the phone to soften the adhesive and thus remove it more easily.


Now, to remove the back shell, first let go of the top and bottom. Then we will have to release all the lateral notches as shown in the fourth and fifth images.


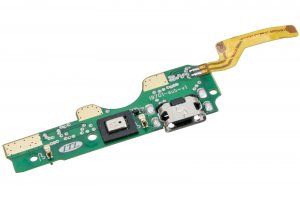
We disconnected the interconnection flex and the coaxial antenna cable. Then we remove the screw that holds the plate to the chassis and also take off the vibrator.
Now we can take off the board and the flex speaker contacts.


To finish, we desoldamos the vibrator of the auxiliary plate.