Guides with all the necessary steps for you to repair the Apple iPhone XR (A2105) yourself.


With a SIM removal tool we remove the SIM tray from the device.


Remove + Create new step with the Pentalobe screws (TS1) with a precision screwdriver.
We apply heat to the pant at 80 degrees for two minutes.
With the suction cup clamp firmly attached to the smartphone, for a corner, we throw a little to separate it little by little.
With a spike we help to take off the screen all around.


We remove 5 Triwing screws (Y0.6) and a Phillips screw (PH # 00).
We remove the protective metal sheets.
We disconnect the connection flexes from the screen.


We unscrew the four standoff screws and a Phillips screw (PH # 00) that hold the base plate.
Remove the three Triwing screws (Y0.6) that hold a protective plate and remove it.
Remove the standoff screws and the two Phillips screws (PH # 00) that hold the SIM tray


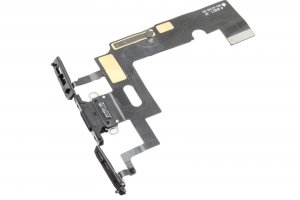
We disconnected the battery flex, the load connector flex, the wireless charging flex, the lower antenna flex with speaker contact, the SIM tray flex, the flex of the side buttons and the camera flex back


We disconnect the flex from the front camera and disconnect the flex contact bridge antennas.
We remove the motherboard.


Remove the two Phillips screws (PH # 00) that hold the SIM tray.
Remove the four Phillips screws (PH # 00) that hold the speaker.
We removed the speaker and the SIM reader.


Remove the two Phillips screws (PH # 00) that hold the vibrator. We disconnect the flex and remove it.


Remove the two standoff screws and the two Phillips screws (PH # 00).
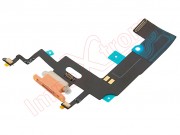
We take off the flex with load connector and remove it.