Guide with all the steps necessary for you to change the components of the Fitbit Versa yourself.


To begin we must remove the straps to work more comfortably, unhook them by pressing the sliding pin of both straps.


We apply heat to the screen with the help of a hot air gun or a thermal mat.


Using a fine tool, we take off all the edges of the screen, taking care not to damage any flex cables. Once the screen is detached, it will touch the NFC antenna.


Remove the three Torx screws (T3) that hold the shield and extract the shield.


We disconnect the flex from the screen and remove it.


We disconnect and remove the NFC antenna.


Disconnect all components that are connected to the motherboard, remove the Torx screw (T3) that holds it, and to remove the plate we just have to tilt the case so that the plate is released.


We extract the three Phillips screws (PH # 00) that hold the shield and with the help of a flat-tipped tool we will disengage it.


Take off the battery taking care not to damage it.


The plate with the charging pins has two Torx screws (T3), but when removing the first one we pointed out in the first photograph, we must take off the plate in order to remove the second one.


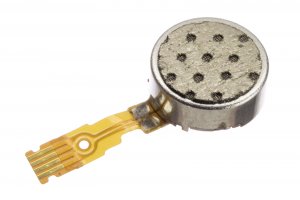
We take off the vibrator, we disconnect it and we can replace it.


