Huawei MediaPad T1 8.0 - Audio connector and light sensor

Guide with all the necessary steps so that you can change the audio connector and light sensor of the Huawei MediaPad T1 8.0 yourself.

Difficulty
1
2
3
4
5
TutorialsTabletsHuaweiHuawei MediaPad T1 8.0Audio connector and light sensor

Tutorial: Step by step

Step 1 Huawei MediaPad T1 8.0

Dimensions : 210.6 x 127.7 x 7.9 mm Weight: 360 g
SoC : Qualcomm Snapdragon 200 MSM8212
Processor : ARM Cortex-A7, 1200 MHz, Number of cores: 4
Graphic processor: Qualcomm Adreno 302
RAM memory: 1 GB
Internal memory: 8 GB, 16 GB
Memory cards: microSD, microSDHC, microSDXC
Display : 8 in, IPS, 1280 x 800 pixels, 24 bit
Battery : 4800 mAh, Li-Polymer (polymer lithium ion)
Operating system: Android 4.3 Jelly Bean
Camera : 2592 x 1944 pixels, 1280 x 720 pixels, 30 fps
SIM card : Micro-SIM
Wi-Fi: b, g, n, Wi-Fi Hotspot, Wi-Fi Direct USB: 2.0, Micro USB
Bluetooth : 4.0
Location / Navigation: GPS, A-GPS, GLONASS

Before starting, make sure that the equipment is turned off.

Step 2 SD card

First, we must remove the card, after a small lid located on the side.

Step 3 Screw

Remove the screw, covered by the warranty seal, located next to the SD card slot.
The screw is Phillips (PH # 00).

Step 4

We remove the back cover by inserting a plastic opening tool and gently prying it all the way around.

Step 5 screen

To separate the screen we must disconnect the data flex from the motherboard, by actuating the tab of the connector and pulling gently.

Step 6 Flex with camera, audio connector and proximity sensor

Remove the 2 Torx screws # 4

Step 7

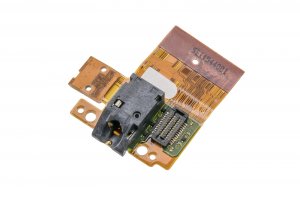
Unplug the flex from the motherboard, by pulling on the tab of the connector and pulling gently.

Step 8 Audio connector and light sensor

Finally, disconnect the rear camera.

Video Tutorial summary

In this video you can watch a quick summary of the tutorial, but we recommend to follow the complete tutorial, with its explanations and detailed images.
Share this tutorial