Guide with all the necessary steps so that you can change the components of the Apple iPad Pro 12.9 "4th generation (A2229) yourself.


To start we must apply heat to the screen, for this we have used a thermal mat, and we have taken off all the edges of the screen with a plastic pick, and when we have already been able to lift the screen, we have verified that both in the upper part and in the lower one, the screen is connected to the motherboard by means of several flexes.


We remove all the Phillips screws (PH # 00) that hold the various shields that cover the connectors of the screen, and with the help of a flat tip tool we will disconnect them.


We remove the Phillips screw (PH # 00) that is in the battery connector, and with the help of a plastic pick we will lift the contacts a little, in order to work with greater security.


We remove the four Phillips screws (PH # 00) that hold the shield to be able to unhook it.


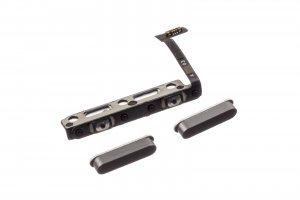
We remove the three Phillips screws (PH # 00) that hold the support where the buttons are stuck, we disconnect the connector of these buttons, and with the help of a flat tool we will take it off, then if we need to also replace the keys, we should only grab them with tweezers and remove them.


