Guide with all the steps necessary for you to change the Wiko Bloom display yourself.


Before starting, make sure that the mobile is turned off.


Remove the back cover with the opening tool, this will avoid scratching the equipment.


Remove the battery by pulling on the bottom.


Remove the SIM and SD cards.


Remove the 10 Phillips screws from the intermediate housing.


Separate the intermediate housing with the opening tool.


Disconnect the rear camera from the motherboard by pressing the tab on the connector.
Finally, gently pull the camera to remove it.


Unplug and remove the front camera.


Disconnect the interconnection flex.


Unplug the display data flex.


Take off the flex with volume pushbuttons and ignition of the chassis.


Remove the Phillips screw that holds the motherboard.
Disconnect the data flex from the touch screen.


Lift the base plate and disconnect the coaxial antenna cable to remove it.


Take off the touch screen data flex.


In this step we will need to heat the glass to soften the glue and thus be able to remove the screen more easily.
Below we will see two ways to perform this step.
We will use a high thermal retention blanket (HOT GLASS) to heat the glass.
Insert the HOT GLASS in the microwave for the time specified in the instructions.
The gun emits VERY hot air, use with caution.
We recommend the use at minimum power and short bursts, since excess heat can damage the equipment.


With the hot screen we introduce the barb or another opening tool to take off the screen of the frame. We will avoid as far as possible the area in which the flex of the screen is located so as not to damage it.


Separate the touch screen from the bottom, leaving the data flex last to avoid damaging it.


Peel off the upper part passing the flex so that it does not get stuck.


Peel off the reflective of the front LEDs.


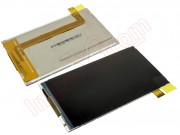
Finally, remove the display by pulling it gently with a suction cup.