Guide with all the necessary steps so that you can change the components of the Oppo Find X2 Neo (CPH2009) yourself.


To begin with, we must apply heat to the back cover to soften the adhesive that holds it, we can apply heat several times since the adhesive is quite strong. With a fine tool we will open a small hole through which we will introduce one or more plastic spikes, so as not to damage the paint of the casing, and we will take off the entire edge.


We extract the ten Phillips screws (PH # 00) that hold the intermediate casing, and with a flat-point tool we will unhook it.


We disconnect the battery to work with greater safety.


We take off the adhesive that is above the connector, and with a flat tool we disconnect the connector from the front camera.


We disconnect the four connectors from the rear cameras and remove the entire module.


We disconnect the components that remain connected to the motherboard.


We extract the Phillips screw (PH # 00) that holds the motherboard, and we can now remove the motherboard.


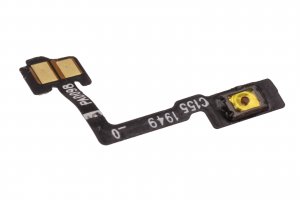
To finish, we will unhook the plastic cover that covers the button hole, by doing so the key will fall off, and to take off the flex we have put a drop of isopropyl alcohol in the contact area, and thus we have taken off the flex with the button ignition more easily.