Guide with all the necessary steps so that you can change the components of the Oppo Find X2 Neo (CPH2009) yourself.


To begin with, we must apply heat to the back cover to soften the adhesive that holds it, we can apply heat several times since the adhesive is quite strong. With a fine tool we will open a small hole through which we will introduce one or more plastic spikes, so as not to damage the paint of the casing, and we will take off the entire edge.


We extract the ten Phillips screws (PH # 00) that hold the intermediate casing, and with a flat-point tool we will unhook it.


We disconnect the battery to work with greater safety.


We extract the six Phillips screws (PH # 00) that hold the lower intermediate casing that covers the auxiliary plate.


We disconnect all the components that are connected to the auxiliary board, and with the help of the extraction tool we will remove the SIM tray.


We lift the auxiliary plate and disconnect the two coaxial cables that are connected to the back of the plate.


We disconnect and remove the two interconnection flex cables that are above the battery.


We take off the adhesive from the side of the battery, and we will introduce a few drops of isopropyl alcohol between the adhesive and the battery, we tilt the phone a little so that the alcohol slides under the battery, and by pulling the green adhesive we will take off the battery, and We will remove the adhesive completely.


We extract the two Phillips screws (PH # 00) that hold the speaker, and when lifting it we must disconnect the plate with contacts that is on the bottom of the speaker.


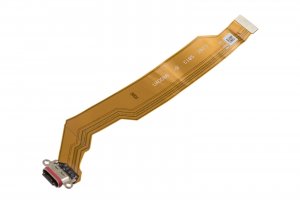
To finish we will take off the flex with the charging connector that we have to replace.