Guide with all the necessary steps for you to change the components of the Nokia 5 yourself.


We start by removing the SIM and SD trays. As we will have to start by removing the screen, we heat it to about 80º for about two minutes to soften the adhesive.


With the hot screen, we introduce a tool between it and the frame. Sliding it around the contour, we will take off the adhesive.
We will need a really fine and hard tool to be able to perform this step. In addition, it is very likely that we damage both the screen and the case.


Remove the Phillips screw (PH # 000) that holds the shield of the screen connector and remove it to disconnect it.


We remove the eighteen Phillips screws (PH # 000) that hold the chassis to disengage it. Before we disconnected the battery as it is attached to the chassis.


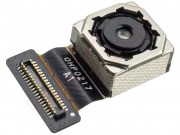
Remove the three Phillips screws (PH # 00) that hold the shield and move it away. Now we can disconnect the rear camera.