Guide with all the necessary steps to change the top plate of the HTC One M8.


You will need to apply heat to the equipment, in order to soften the glue and to peel off easily. We suggest the use of HOT GLASS, with high thermal retention.
Insert the HOT GLASS in the microwave for the time specified in the instructions.
To heat it evenly, it is necessary to interrupt the microwave every 30 seconds to distribute heat throughout the HOT GLASS with your hands.
Apply heat to the plastic covers on the top and bottom of the screen, where the microphone and handset are located.


Peel off the lower and upper covers with the pick. Apply enough heat until it comes off easily.


Remove the screws that hold the housing.
We advise you to use an interchangeable tip screwdriver.


Remove the nano SIM, micro SD trays next to the cards.


Slowly, take off the back cover, starting at the top:
Start by inserting the tine between the cover and the frame of the housing. Continue separating with the double opening tool (green), combining it with lever movements with the simple opening tool (black).


Separate the back cover.


Remove the tape that covers the connectors on the motherboard.
Disconnect the flex cables from the motherboard, pulling the connectors and gently pulling the flex.


Remove the 2 Phillips screws that hold the battery connector and the coaxial cable located above it.


Disconnect the battery and speaker flex from the motherboard.


Unplug and detach the coaxial cable from the motherboard.


Disconnect the interconnecting coaxial cables.
Remove the 2 Torx screws that hold the base plate.


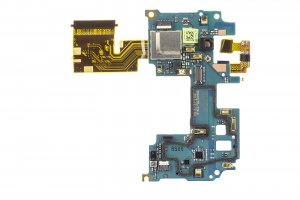
Remove the motherboard.


Before continuing, take off the flex of volume buttons so as not to damage them when removing the battery.


Take off the battery with the wide part of the double opening tool.


Remove the vibrator with the curved tip clamps and disconnect it from the base plate.


Remove the plastic support that partially covers the front camera connector.


Disconnect the coaxial cables from the top plate.


Disconnect from the motherboard and remove the front camera.


Unplug the flexes of the SIM and SD readers from the motherboard.


Remove the 5 Phillips screws that hold the top plate.


Separate the base plate from the chassis and remove the flex from the power button.


Unplug the flexes from the cameras on the motherboard.


Finally, remove the interconnection flex.


