Guide with all the necessary steps so that you can change the wifi antenna of the iPhone 6 Plus yourself.


Before starting make sure that the iPhone is off.


Remove the 2 3.6 mm Pentalobe screws located on both sides of the charging connector.


Use the special tool with suction cups to separate the front panel easily.
Just place the iPhone with the bottom towards the tool and adjust the suction cups.
Then press to separate the front panel.


Separate the front panel, leaving the upper part joined by the flex data cables.


Remove the metal shield that covers the connectors on the board. It is held by the following Phillips screws:


Disconnect the flexes from the front panel on the motherboard.


Separate the front panel.


Remove the metal shield covering the battery connector, held by 2 Phillips screws:


Disconnect the battery in the motherboard.


Disconnect the coaxial antenna cable.
Disconnect and remove the flex from the lower load connector module.


Remove the vibrator, held by 2 Phillips screws of 2.5mm.


Remove the small adhesive that covers the camera screw.


Remove the metal support that covers the rear camera, held by 2 Phillips screws:


Disconnect the camera from the motherboard.
Take off the camera by pulling it gently.


Remove the metal shield covering the connectors on the board, held by 2 Phillips screws:


Disconnect the coaxial cable from the upper antenna.
Disconnect the 2 flexes located on the top of the battery.


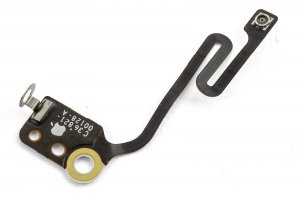
Remove the upper antenna, held by 3 Phillips screws:


Remove the small angled support held by 2 Phillips screws.


Remove the 3 screws that hold the motherboard to the housing:
Use a flat head on the screwdriver to remove the "standoff" screws.


Carefully turn over the base plate starting at the bottom, leaving the top attached by a small flat antenna cable.


Disconnect the coaxial cable and separate the motherboard.


Finally, remove the Phillips screw and detach the antenna from the housing.


