Guide with all the necessary steps so that you can change the components of the Apple iPhone 12 (A2403) yourself


First, we apply heat to the terminal on the screen part to soften the adhesive and be able to separate them.


Next we extract the two Pentalobe type screws (TS1) and with the help of suction cups and a fine opening tool we separate the screen from the terminal until it is detached from the chassis


We remove the Triwing screws (Y0.6) from both shields that are shown in the first photo of this step and remove them.


Now we disconnect the battery and the flexes that join the screen to the terminal chassis in order to separate them.


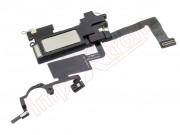
Finally, to release the screen, we release the Phillips type screws (PH # 00) that hold the earpiece from the screen and we will have the screen free of components.


We remove the four Phillips type screws (Ph # 00) that hold the speaker, then we take off the flex from the screen and once it is taken off we can remove the microphone headset and sensors that complement it.